Updated on 12th November 2025
Placeholder
Updated on 6th October 2025

This guide is created based on the Chat menu in the Lignum app.
Responding quickly and accurately to guests inquiries is one of the simplest ways to maintain guests satisfaction after booking your property. Now, you can do it straight from your phone using the Chat feature on the Lignum app.
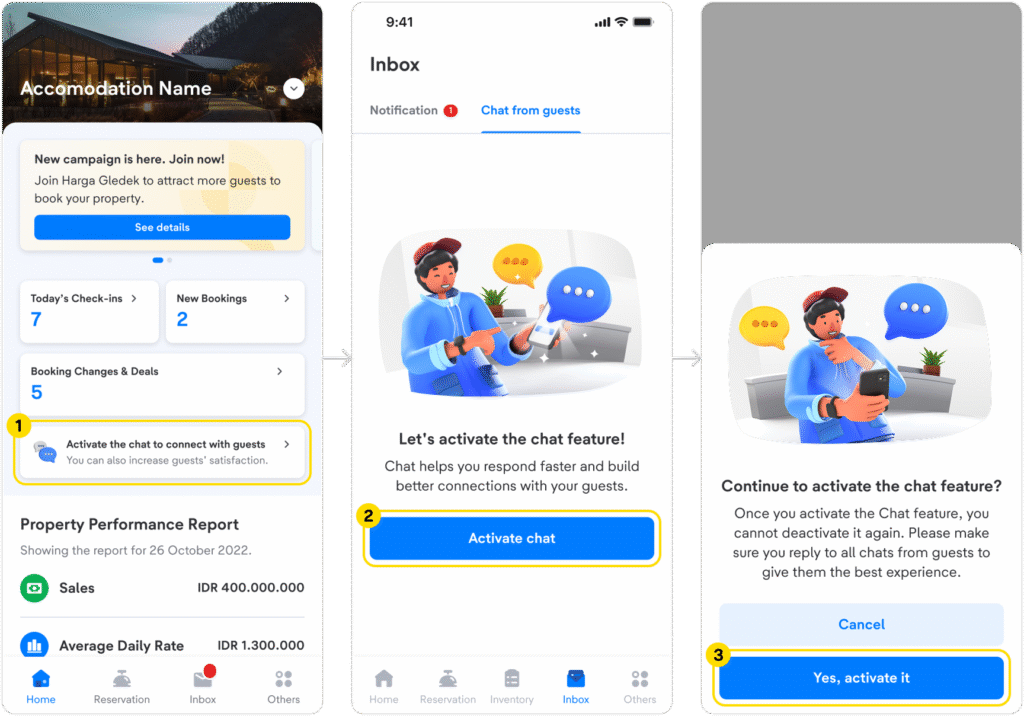
To start using Chat feature, open your Lignum app by logging in with your registered email address and password, then follow these steps:
Once activated, you will be automatically directed to Chat from guests tab under the Inbox menu. You can also access this tab via Home > click Chat button.
Your conversations with guests will begin after receiving guest messages, with confirmed booking details as the first line to ensure you are responding to the right guest.
The feature is packed with the flexibility to reply in various formats to give guests complete and clear information, such as text, images (.jpg, .png, and .gif), and documents (.pdf) up to 5 MB.
Guests may send questions regarding their booking in a row. To make sure your answer aligns with each question from guests, you can use the Inline Reply feature.
Simply just swipe the message you want to reply and type your response as usual. This helps your guests receive the right answers for each of their questions.
In your chat list with guests, you can find the chat from a specific guest by typing the guest’s name into the Search by guest name box.
The system will instantly display relevant chats based on the name. Pick the chat you are searching for and use the Chat feature as above.
Next to the Search by guest name box, you will find the Filter feature to help you sort and organize chats. Right after tapping the filter icon, Lignum will display option pop-up, such as:
As your property receives many bookings, you may get some pre check-in questions repeatedly from guests. To help you answer those frequently asked questions (FAQ), you can save your FAQs’ answers in General Info.
Add the information by clicking settings icon under Chat from guests tab, then follow these steps below:
The information you have created will be displayed in the chat window under General Info. Through this menu, guests can find the answers to the FAQs without needing to wait for your manual reply.
Be the first to build a guests’ positive experience of your property with the Chat feature on Lignum app. Log in to your account and activate Chat feature today for quick and efficient communication.
Updated on 2nd October 2025
Implementing the right strategy for managing your property’s pricing is key to maximizing profit and providing attractive offers for every guest. To enable you implement the right pricing strategy, the tiket.com Extranet provides various features to set additional charges applicable at your property beyond the room’s nightly rate.
These are 4 types of additional charges you can set in the Extranet:
With the various options available, you now have full control to set additional charges that suit your property’s needs. This not only helps you optimize revenue but also provides better price transparency for guests from the beginning of their booking. Learn and try out all these features on your Extranet now to perfect your pricing strategy!
Updated on 1st October 2025

This tutorial was created based on the Bookings menu on the tix.tiket.com website’s desktop version.
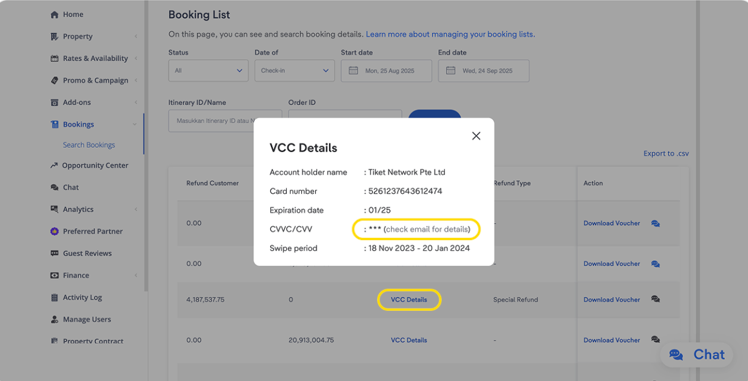
The security of your payment information is now further enhanced with the newly implemented CVV (Card Verification Value) delivery. If you are using VCC (Virtual Credit Card) as your payout method, the CVV will no longer be displayed on the Extranet. Instead, it will be sent directly to your email for every valid booking.
Aside from the CVV code, you can access other payment detail in the Bookings menu > Search Bookings submenu > VCC Details for every bookings, such as:
We will send the CVV code to the Finance and Administrator roles’ email addresses along with the booking voucher email once your property receives a confirmed booking. To ensure you can safely receive your CVV, take these 2 actions below:
Once the previous steps are completed, you’ll receive an email every time your property receives a booking. The title of the email will be: “(Confidential) CVV details for Itinerary ID [Itinerary Number]”
To view the CVV code, you need to download the attached document in the email. The document includes the Booking Details along with the Payment Details & CVV, allowing you to verify that the CVV can be used to charge the specific booking.
Booking Details include the following information:
Payment Details & CVV will show the information as below:
With this information, you will be able to use the CVV code to charge payment for the itinerary ID as specified in the attachment.
If your VCC has reached its expiration date, our finance team will issue you a new VCC and you will receive it in an email with the subject : “Updated CVV Information – Itinerary (Itinerary Number)”.
You will also need to download the attached document in this email to get the CVV code along with the following information:
If you are managing your property through a Channel Manager or Switcher, your CVV code will be displayed directly on the Channel Manager or Switcher’s dashboard you are using. You can then use the CVV code to charge your payments.
Now, you have full control over how the CVV code is used. For the security of your payment information, we recommend keeping this code confidential and avoiding storing, printing, or sharing it.
This approach is designed to protect your payment information better. With your careful handling of each action and decision, together we can keep your transactions secure.
It’s time to confirm that the users with Finance and Administrator roles are registered and activate the notification in the Manage Users menu to receive CVV code via email.
Updated on 14th August 2025
Post-book score is a rating system that measures the quality of your property’s facilities and services after a guest has made a booking. This score is calculated based on the number of guest complaints (especially regarding check-in and facilities), your property’s response time to these complaints, and your overall review ratings.
Properties with a low post-book score will get a display warning on their property page, potentially impacting visibility. Additionally, these properties will receive weekly performance reports via email.
To help your property achieve a high post-book score and enhance guest satisfaction, here are the steps you can take:
We understand that maintaining consistent performance can be challenging. However, these steps are crucial for ensuring guest satisfaction and maintaining your property’s reputation on tiket.com.
By following these guidelines, you’ll not only improve your property’s post-book score but also provide an unforgettable stay experience for every guest.
Updated on 14th August 2025

This tutorial was created based on the Property menu on the tix.tiket.com website’s desktop version.
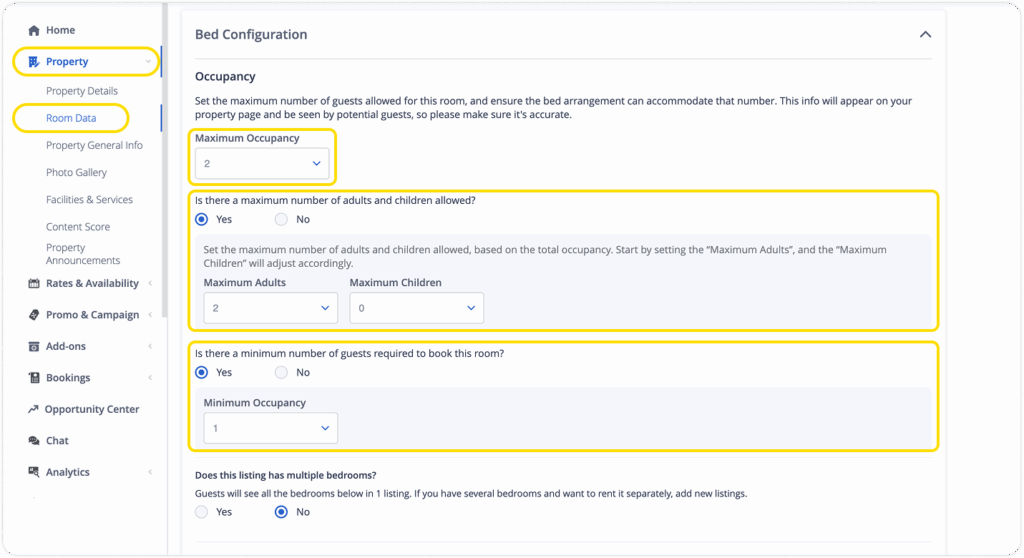
At tiket.com, we use occupancy to describe the guest capacity per room type or unit. It is crucial to understand how to set the occupancy correctly, because room occupancy can maximize your property’s visibility when tiket.com users are searching for accommodations.
To help you with this, we have provided various features in Extranet that you can use to set up your room occupancy easily, such as:
To help you understand how these features work, let’s look at an example. Imagine your property has a standard room with a maximum capacity of 3 guests, and it allows 1 child guest to stay in the room. Based on this scenario, here are the correct occupancy settings for your room:
With these settings, your property will appear on the tiket.com Search Results Page if a user searches for:
However, your property will not appear on the Search Results Page if a user searches for:
Here are the steps to set up room occupancy in the tiket.com Extranet:
By understanding and applying the correct occupancy settings in the tiket.com Extranet, you not only ensure your property information is accurate but also increase the chances of your property being discovered by potential guests. Maximize your property’s visibility by setting up your room occupancy now!
Updated on 2nd October 2025
Setting up additional fees helps improve transparency, reduce manual workload, and prevent miscommunication between your property and guests. It also allows properties to easily account for government-mandated local taxes or tourism taxes that customers often need to pay upon check-in, ensuring compliance with local regulations and accurate collection of all due amounts.
Follow these steps in the Extranet to configure your additional fees:
On this page, you will find options to manage your fees:
When setting or modifying an additional fee, you will need to provide the following details:
Ensuring these fees are accurately set up helps provide guests with clear information, leading to a smoother check-in process and preventing potential disputes over payment amounts. Additionally, it’s necessary to regularly review your additional fee settings to ensure they align with your property’s policies and local regulations.
A few quick steps can make a big difference in streamlining your operations. Take action today!
Updated on 12th August 2025
Geo Rate is a special feature that gives you flexibility to offer discounts for specific countries with high potential to drive more bookings to your property. Through this guide, tiket.com will walk you through setting up your Geo Rate promo step-by-step and activating your Geo Rate promo successfully.
First, make sure you have logged in to Extranet. Select the Promo & Campaign menu, then click the Add New submenu. Under Promotions, choose Geo Rate feature in Targeted Promo section and continue your steps with these guide:
In this section, you can set your promo by continent or country level according to your needs.
If you want to set the promo on the Continent level, you can select the continent(s) of which the promo will be applied from the dropdown menu. By selecting a continent, your promo will automatically apply to all countries in it. To exclude specific countries, click Add exceptions below the selected continent, then choose one or more countries to exclude them from the promo.
On the Country Level tab, you can choose one or multiple countries where the promo will be applied.
Fill in the discount percentage and the minimum length of stay required for guests to get the promo.
In this step, you can choose to offer the promo to users who are logged in or non-login users on various platforms. Simply tick the box where you would like your promo to appear in each section (Login and Non-Login), whether on desktop web, mobile web, Android, or iOS.
Select one or more Room Types where you wish to include in your Geo Rate promo. Then, choose at least one Rate Plan for each chosen room type.
You can offer the Geo Rate promo anytime or for a certain booking period. If you want to set the promo for a certain booking period, choose Specific days and time. Then, you can select the Start and End dates, and also choose specific days and set the exact Start time and End time for the booking period.
You can set the stay period applicable for the promo anytime or during Specific dates only. To set a specific stay period, simply choose Specific dates and set the Start date and End date.
Easily manage how your Geo Rate promo works with other promotions by turning the toggle on or off. Each setting creates a different promo stacking scheme:
You can add Blackout Dates up to 30 days per year by switching the toggle on. Select each blackout date by clicking on the calendar view and double-check your selected dates in the Selected blackout dates window on the right side
Lastly, make sure to review all settings and click the Create Promo button to save.
After creating your Geo Rate promo, you can always go back and manage it through the Promo & Campaign menu > Your Promotions submenu > Targeted Promotions tab.
Your Geo Rate promo will be displayed as a single item per country or continent. In every item, you can temporarily stop the promo by switching the Status toggle off.
You can also always review, update, or delete each Geo Rate promo using the Action feature.
Activating Geo Rate is an excellent way to tap into high-demand international markets, helping you stay competitive, attract more relevant traffic, and achieve stronger conversion.
Start maximizing your property potential now with Geo Rate!
Updated on 29th July 2025
This guide is made from password reset setting procedure in Lignum.
Log in to your property account at Lignum by tiket.com (Extranet) is the initial getaway to effectively monitor and manage your property performance. Any issue in performing log in might affect your decision-making for an even longer time. This guide will prevent you from having so.
Before logging in, first make sure to have Lignum by tiket.com (Extranet) app right on your phone. Then, follow the steps as below:
Forgot your password account? Here is how to counter only within a short time:
Once you bring any task and monitoring to a close or wishing to end the session, exit from the app through these quick steps:
Now, you are ready to navigate all the menus on a main dashboard, from Reservation, Inventory menu, the latest tiket.com’s campaign, all the way to logging out from the platform.
With Lignum by tiket.com (Extranet), get the best experience of easy log in, seamless checking check-in and reservation information, and smooth management of room availability and rate.
Download Lignum by tiket.com (Extranet) now by clicking the link below and enjoy the freedom to monitor your property, anywhere.
Updated on 6th October 2025
As a property manager, every moment is a golden opportunity. Keeping your room availability and rates up-to-date with current conditions is a key way to achieve a higher potential revenue. Now, you can adjust both with ease via the Lignum by tiket.com (Extranet).
Start updating your current room availability and room rates with the steps below:
You also have the flexibility to manage room availability with the Close-out, Close-to-arrival, and Close-to-departure features, available for individual room types. Simply activate them as needed.
Changing the total number of available rooms and room rates for a specific period of time in Lignum by tiket.com (Extranet) is more practical by following these steps:
Your property’s room availability and rates now have been updated on tiket.com! This guide helps your property stay as a preferred option for guests through readily available room types, minimizing the chance of them considering other properties, and consequently maximizing your revenue during the holiday season.
Download Lignum by tiket.com (Extranet) app via the link below, and manage any features quickly and conveniently, all from your phone.